Monday 3 August 2015

GSoC Week 6 & 7 : Tri Planar Texture Blending and Marble Noise

I spent most of my sixth week by writing shaders for blending part of tri planar texture mapping and completing my mid term goals. Clearing blending needs a lot of testing for a wide range of terrains but with my current pseudo random generator, terrain generation is restricted to some extent.

Initially the blending was done with the help of normals to the surface. The normal vector is normalized and broken into its components, and textures are applied in proportion to the blending values derived from normal vector components. Although technically correct, this blending technique was not so pleasant visually. Here is a code snippet for the process.

vec3 blending = getTriPlanarBlend(vNor.xyz );
vec4 xaxis = texture2D( colormap, vPos.yz );
vec4 yaxis = texture2D( colormap, vPos.xz );
vec4 zaxis = texture2D( colormap, vPos.xy );
vec4 colorTex = xaxis * blending.x + yaxis * blending.y + zaxis * blending.z;

From the getTriPlanarBlend function, we get the blend vector using the world space normal vectors. Then we take samples of the same texture in three different directions and we finally blend those textures to get the final texture. Here is a sample tile texture mapped on the terrain generated.
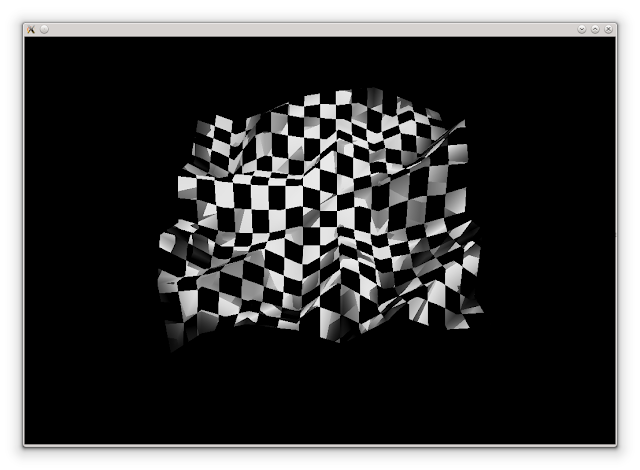


Here we can see a that most of the slopes are near 45 degrees and thus two or more textures are blended together to give a messed up look. A more focused blending is implemented where smaller components are eliminated and only larger components are considered. Here is another snippet to eliminate smaller vector components of the blending vector.

float threshold = 0.60;
if(blending.y > threshold){
    blending.y = 1.0;
    blending.x = 0.0;
    blending.z = 0.0;
}
if(blending.z > threshold){
    blending.z = 1.0;
    blending.x = 0.0;
    blending.y = 0.0;
 }
 if(blending.x > threshold){
     blending.x = 1.0;
     blending.y = 0.0;
     blending.z = 0.0;
}

This is one of the blending corrections done to make the texture more usable.
But even this is not enough. This is just a fix for now but a more robust blending functionality is needed. We can make use of Texture Splatting but a lot of overhead processing and storage of an extra alpha channel might slow down the terrain generation. Though a look at the terrain after a few such corrections is better to get us moving.
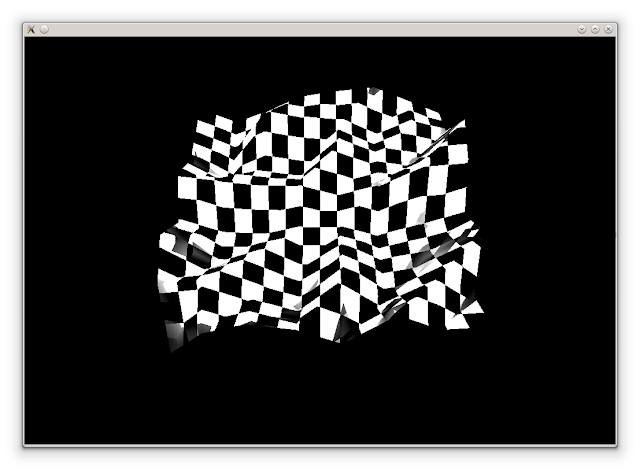
But these not so curvaceous terrains are not good for any real purpose. A better looking marble noise can be used for more terrain like features. A sample screenshot is shown below(please ignore the texture stretching as I was using planar mapping because of broken code). Still these terrains can not look like a real life terrain because after all we are creating them out from a random set.

So most of the seventh week was spent playing and testing with different sine and cosine functions which utilize the current pseudo random generators. Here is one of the function used in generating marble noise. I have omitted the parameters for noise function.

Cos(x * scale/xdim + y * scale/ydim + twist * noise())


Well I feel the need of developing a proper GUI for terrain generation and using interactive algorithms like marching cubes, but for now it is out of scope from my current project timeline. I will definitely try to implement some part of it after I complete my current milestones.


Friday 10 July 2015

GSoC Week 4 and 5: Triplanar Texture Mapping

According to my proposed timeline, I was supposed to work on quadtree LOD implementation in this week. As I already implemented procedural terrain generator noise functions, I just needed to work on Landscape class to implement the LOD functionality. This would have increased the rendering performance for larger terrains. But as I started into the fourth week, I realized that I might have to make changes in the terrain shaders. This shifted my focus on understanding the shaders, as I am new to GLSL. So finally I decided to implement the Triplanar Texture mapping instead of quadtree.


Problem with Planar texture mapping

Normally, textures are mapped to a surface using UV coordinates which are 2D in nature. So while mapping textures to a particular surface, we don't take height difference between two neighbouring UV coordinates under consideration and just map the textures. This is the gist of Planar texture mapping. So the problem arises is that the neglected hight difference might cause texture to stretch between two points. Unlike simple objects where we can try unwrapping the UV coordinates, in procedurally generated objects it is hard to know the nature of surface and so the corresponding UV unwrapping.


Solution? Triplanar Texture mapping

The Triplanar texture mapping is rendering the same texture three times along the X, Y and Z axis. The fragments that are facing the corresponding directions gets that texture applied to it according to the ratio of the normalized and absolute world space normal. So essentially we are using actual world coordinates instead of UV to apply texture three times in the fragment shader of the material.


Above is a comparison of Planar vs Triplanar texture mapping using the same texture. Notice how textures are stretched in the upper picture while in the lower picture, the original dimensions are somewhat maintained. Although the results are somewhat less desirable due to blending anomalies. 


Steps to Triplanar Textures

  1. Calculate blend factor for each fragment for all the three directions using the world space normal.
  2. Now sample the texture along the three directions using the world texture coordinates.
  3. Mix the blend values with the textures to get a final value of textures for that fragment.
  4. Similar steps can be applied for normal/bump maps.

Here is an another example with a grassy rock texture to the same terrain that we used earlier. Normal texture mapping stretches the whole texture to the surface which gives it an unrealistic look. Here Triplanar texture comes to the rescue.

Using Planar Textures with UV mapping
Triplanar Texture mapping


Problems Faced

I am still having trouble with properly blending the textures from different directions. Some textures like the black and white tiles look really bad as the terrain gets rough. I am still trying to formulate a blending method that will result in better blend factors.

Wednesday 1 July 2015

GSoC Midterm Status

So here I will give an update to the progress that I have made so far, the milestones that I completed and timeline changes that happened so far!

Overview

Week 1: Fixed a few bugs, fixed landscape example and added a basic noise generator function in Heightmap class.

Week 2: Started implementing Simplex Noise and added C bindings for new API call soy.textures.Heightmap(texture_width, texture_height, frequency).

Week 3: Implemented Simplex Noise and later did some performance improvement to it by removing redundant code. Milestone 1 completed.

Week 4 and 5: Supposed to work on LOD and quad tree implementation but decided to work on Texture mapping instead. Implemented Tri planar texture mapping. Added Triplanar class to soy.materials, added corresponding shaders and the C bindings.

About week 4 and 5

Due to some reasons, I got a bit slow in this week but I will catch up with the upcoming milestones. At first I started working on Level of Detail but soon realized that I have to write separate shaders for Terrain, so why not implement Tri Planar Texture mapping first. In that way, I will gain more knowledge over GLSL and that will facilitate the implementation of LOD.

So pretty much I wasted a few days struggling to decide between two sub milestones as both of them are important. Well then finally with the consent of my mentor, I decided to go for texture mapping. There is still some work left as the output is not as desired.

Problems Faced

Currently there is a small problem with the fragment shader for Tri planar texture mapping as the normal vectors are not giving the correct values, so the final texture is somewhat gibberish.


Schedule and Lagging

I am running about four to five days behind the schedule but I hope to cover all the left out work before the next milestone. I will complete the automatic texture mapping by this week and move to the next sub milestone as soon as possible.


GSoC Week 3 : Further into Terrain Generation

I spent most of my third week by adding improvements to the noise functions and experimenting with different parameters of it. In my previous blog on Simplex Noise I explained the different terminologies used in Noise such as Amplitude, Frequency , Octaves and Persistence. Here I will be showing the different type of terrains generated by changing these parameters.

Just to recall, the current API call for creating a heightmap texture is
soy.textures.Heightmap(texture_width, texture_height, frequency)

So I am planning to add amplitude, number of octaves and persistence as parameters to the API as well. But for now, just to avoid confusion for the new developers I have kept it simple. So here I will be manually altering the parameters from libsoy library to show some of the terrains created by the Noise functions I implemented.

So here a terrain with persistence equals to 0.8, number of octaves added is equal to 12 and frequency equals to 5. I am currently working on removing the sharp edges from terrain as shown in the example. We can smoothen the terrain by reducing the frequency and increasing the persistence. So here is another example (persistence = 1.0,octave = 12,  frequency = 1).


Increasing the frequency will bring in some new sharp peaks bur the overall appearance of terrain will remain the same. Here is an example below after increasing the frequency to 10.


I will be adding a dictionary in the future with some custom keywords such as mountains, plateau, desert, etc. which will automatically select the best possible terrain configuration for the user. But due to the bad performance for rendering larger terrains, I am keeping it in my bucket list until completion of some terrain rendering optimization techniques and automatic texture mapping of terrains. So for now I am moving onto my next milestone, but I will keep optimizing and improving the procedural terrain generation mechanism.


GSoC Update: Understanding Simplex Noise

Before diving into the concept of Simplex Noise, we need to understand what noise is and what are the applications of it. Here I will be giving an overview about different type of noises and why and how they were developed.


Background

So it all started back in 1980s when Ken Perlin was working on the CGI for the animated movie Tron. The graphics were not realistic at that time and have a machine like appearance which made them look artificial. So Perlin developed a gradient noise which was pseudo random in nature to create natural looking textures. After that, people started using noise extensively all over the world.

Source: GPU Gems 2

The picture above is an example of procedural bump mapping using pseudo random noise. I have written pseudo random and not just random because we need to have a predictable texture, making it completely random might cause problems. For more noise related example, you can have a look at my previous blog.


About Perlin Noise

Perlin noise is a gradient noise, which means that we put pseudo random gradient points at fixed interval of time and then interpolate them into a smooth function as shown in the figure below. 


For 1D noise, we assign a gradient values to integer coordinates and then interpolate between the points keeping the value of function zero at coordinate points.

A gradient function in 1D

For 2D noise, the method is more or less similar. Here we have a two dimensional square grid and at any point on surface, the function value is calculated by taking contribution from the four corners of the grid cell. The value from each corner is extrapolation of the linear ramp with assigned gradient.

There are few disadvantages of using Perlin noise, First of all the complexity of the algorithm is O(N^2) and secondly there are directional artifacts which is not desirable. 


Terminologies used in Noise

Earlier we talked about different wave like functions that were created by interpolating gradient points. Now we have a understanding that noise is like a wave and in fact a fifth degree polynomial blending function is used by Perlin noise for interpolation. So noise is also represented with similar terminologies as that of a regular wave i.e. sine or cosine wave.

Amplitude: It's the difference between maximum and minimum value of the function.

Wavelength: It's the distance between two gradient points on the function.

Frequency: It is inverse of wavelength.

Octave: Just like musical octaves, each successive noise function have a frequency double than the previous one.

Persistence: For simplicity, we can think of it as a factor with value between 0 and 1. It is multiplied with amplitude in successive octaves.


Simplex Noise

In Simplex noise, we try to fill the space with simplices (geometrically compact shapes) having the minimum number of corners. For example, in one dimension we use straight line, in two dimension we use equilateral triangle( three corners), in three dimension we use tetrahedron(4 corners) and so on.

Here I am going to talk about its implementation in mainly 2D textures for generating heightmaps for terrains. So as I mentioned, for 2D space a simplex grid is made up of equilateral triangles.

A 2D Simplex Grid

So similar to Perlin Noise, the value on the surface is calculated by summation of contribution from each corner of simplex grid. Note that Perlin noise had four corners corresponding to a two dimensional grid, but here we have only three.


  The most important part of calculation of noise value at surface is to find the simplex in which we are currently present. In 2D grid we can skew the equilateral triangles to form a grid of right angled isosceles triangles such that two such triangles form a square with side of length one. 

Now by looking and comparing the values of the transformed coordinates (x,y) , we can easily find out about the position of the point in the grid.

Due to lesser computational complexity of O(N) and due to the ease of implementation, Simplex Noise is preferred over Perlin noise.


Adding octaves to the noise function

Multiple octaves of noise can be added by summing multiple passes of noise. The contribution of each succeeding octave is determined by the persistence. The larger the persistence, the more of each octave is included in the total.Here is an example where six octaves of noise is added up and the final result is shown.

Different Octaves of Noise

Final noise pattern after multiple passes of noise function

This might not be the best explanation of Simplex Noise but I have written it to make my own understanding clear about the noise algorithm. You can find a detailed and simplified explanation of Simplex Noise in the article by Stefan Gustavsan. Other references include Perlin Noise explanation by Hugo Elias and a talk by Ken Perlin himself.

Leave a comment if you find anything out of place.


Sunday 28 June 2015

GSoC Week 2 : Adding Noise Functions for creating Procedural Terrain

This week is all about implementation of different noise functions in Heightmap class. I have covered the basic implementation of a noise function earlier and also added the c bindings. This week I will be extending my work by implementing Simplex Noise. I will be writing a detailed blog on an explanation on the Simplex Noise algorithm but here I will just go through the work that I did so far.

Basically I added two main functions that will generate noise based on the Simplex Noise algorithm. One is raw noise function that will calculate the noise from the simplex grid and return a value between -1 and 1. Other function is octave noise which will add multiple passes of raw noise with higher frequency and lower amplitude in each successive pass. The noise functions are adapted from Stefan Gustavson's implementation of Simplex Noise.


Here is the screenshot for the final output that is generated by the noise functions. The above terrain is created by applying ten octaves of Simplex noise with frequency being doubled and amplitude being reduced to half at each successive pass. Though results are not satisfactory for now, but they are reasonable enough to move on to the next milestone that will use the terrain.

To sum it up, the current API call for generating landscape using pseudo random noise function is soy.textures.Heightmap(texture_width, texture_height, frequency). Here increasing frequency means that more gradient points are added in the free space which are then normalized to give a look of a smooth terrain. I am still working on it and will keep adding improvements to it.

Friday 12 June 2015

GSoC Week 1 : Start of the coding period Part 2

So to give some idea about heightmap, here is an example which I have written using Python in Pysoy. It basically generates pseudo random texel values over the required texture. I have created a four vertex mesh and applied the textured material while mapping the texture over it using the uv coordinates. Here I am just coloring texels with eight bit greyscale values.


By changing the smooth attribute we can toggle between the abrupt pixelation to smoothly varying interpolated colour values which is just like a blurred image.


So this is what a heightmap would look like, although after implementation this would create the most unrealistic and terrific looking terrain. As we can see that light colour values will create hills and other elevated areas and darker values will create valleys. This was just a test and the final implementation would be much better.

For now, PySoy has an API call for getting heightmap data from PNG or JPG format images and it passes it over as eight bit grey-scale values. My task for the rest of the week is to implement my small test code in LibSoy where all the processing happens. For this I need to implement another method in Heigtmap class which can take some numerical values like dimensions of heightmap and couple of other variables as parameters.

A code snippet from LibSoy (Language : Genie)

As you can see that there is a noise function which is being called inside the heightFieldData method. This is where the pseudo random texel values are assigned. The above method need to have corresponding C bindings in PySoy so that it can be called from there. Another step was to add the required bindings for this.

Writing binding was bit tricky but not as tough as I anticipated. Actually I just added a few lines of code to the present bindings for Heightmap API. The most important part of it was to parse the parameters and pass the function as a g object, the rest is taken care by the LibSoy libraries.

With this done, I am almost in the beginning of week two and already pushed this much of work. By the way, I am also getting a hang of Mercurial, which is a version control system written in Python. It is similar to Git and easy to use. With the completion of week one, I have a clearer view of things lying ahead. Next step would be to implement the different noise functions. 

So stay tuned to know more about the upcoming week.